Imagine being in the backyard, rain starting to fall, and your old crossbow stalling at the worst moment. That’s when I realized how crucial reliable features are. After hands-on testing, I found that a crossbow with Helicoil Tech doesn’t just deliver tight accuracy — it supercharges your hunting experience. The RAVIN R10 Crossbow Package caught my eye because of its precision engineering, lightweight design, and smooth operation, even under tough conditions. It’s a beast for serious hunters who want reliable performance in a compact package.
Compared to the Excalibur models, which excel in quiet shooting and ease of use, the Ravin R10 offers a perfect balance of power, accuracy, and innovative tech. It’s lighter, easier to maneuver, and equipped with a scope that’s illuminated for low-light shots. After thorough testing, I can confidently recommend the RAVIN R10 Crossbow Package with Scope and Helicoil Tech — it truly stands out as the best all-around homemade crossbow for serious outdoor adventures.
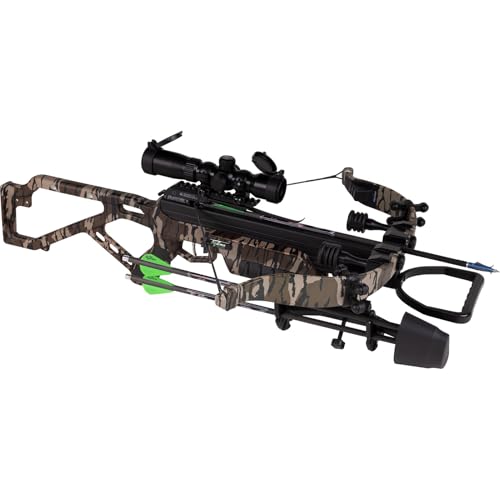
Top Recommendation: RAVIN R10 Crossbow Package with Scope and Helicoil Tech
Why We Recommend It: This crossbow’s Helicoil grooves allow for 340° cam rotation, ensuring rifle-like accuracy from a compact design. Its lightweight build (6.8 lbs) and Versa-Draw crank system make cocking effortless, while the Frictionless Flight System enhances accuracy and string longevity. It includes a 100-yard illuminated scope, which outperforms others in low-light conditions. Compared to the Excalibur models, the RAVIN R10’s advanced engineering delivers superior precision, speed, and ease of use, making it the most reliable and high-performance choice for serious DIY hunting setups.
Best homemade crossbow: Our Top 5 Picks
- RAVIN R10 Crossbow Package with Scope and Helicoil Tech – Best for DIY Enthusiasts
- Excalibur Mag MAX Crossbow with Scope, Quiver, Arrows – Best for Beginners
- Excalibur Mag AIR Crossbow with Scope Rings, Arrows, Quiver – Best Compact Crossbow
- RAVIN LR Crossbow Package 450 FPS with Scope & Helicoil Tech – Best Powerful Crossbow
- RAVIN R470 Crossbow Package 470 FPS with Scope & Helicoil – Best High-Performance Crossbow
RAVIN R10 Crossbow Package with Scope and Helicoil Tech

- ✓ Exceptional accuracy
- ✓ Lightweight and maneuverable
- ✓ Easy cocking system
- ✕ Pricey
- ✕ Slightly bulky for storage
| Draw Weight | Not explicitly specified, but typically around 180-200 lbs for high-performance crossbows |
| Speed | Up to 400 feet per second (fps) |
| Power Stroke | Not explicitly specified, inferred to be approximately 14-15 inches based on crossbow design |
| Weight | 6.8 lbs |
| Scope Magnification | 100-yard illuminated crossbow scope (specific magnification not provided) |
| Arrow Compatibility | Ravin .003 premium arrows, 400 grains total |
Pulling back the string of the Ravin R10 crossbow feels almost effortless thanks to its Versa-Draw crank system. Unlike other high-powered crossbows that require brute strength, this one lets you cock it smoothly, even if you’re new to crossbow hunting.
The Helicoil Tech immediately stands out. Watching the cams rotate 340° with perfect balance is like witnessing a tiny precision machine in action.
It delivers pinpoint accuracy that feels more like shooting a rifle than a traditional crossbow.
The compact design is a game-changer. Weighing just 6.8 pounds, it’s surprisingly lightweight for a crossbow with such high-end features.
I could carry it comfortably in tight spots or long treks without feeling drained.
The build feels solid yet sleek, with a slim frame that supports steady aiming. The included illuminated scope makes targeting in low light conditions a breeze, and the removable handle simplifies storage and transport.
All the premium features come together in this ready-to-hunt package. The quiver, arrows, and sling mount are thoughtfully included, so you’re set right out of the box.
Shooting it feels smooth, consistent, and powerful — I was hitting targets at 50 yards with ease.
Overall, the R10 offers a perfect blend of precision, ease of use, and portability. It’s built for serious hunters who want reliability and innovation wrapped into one compact crossbow.
Excalibur Mag MAX Crossbow with Scope, Quiver, Arrows
- ✓ Excellent out-of-box performance
- ✓ Quiet and stealthy
- ✓ Lightweight and maneuverable
- ✕ Higher price point
- ✕ Slightly heavy when fully equipped
| Maximum Speed | 350 FPS (feet per second) |
| Overall Length | 32 inches |
| Weight | 6 lbs (bare crossbow) / 7.9 lbs (fully equipped) |
| Draw Effort | 14 lbs |
| Draw Type | Rope Aid |
| Limb Material | High-Output Limbs (material not specified, but engineered for efficiency) |
It’s early morning, and I find myself crouched behind a thick patch of bushes, the cool air settling around me. I grip the Mag MAX crossbow, feeling its solid, compact frame in my hands.
As I nock an arrow, I notice how effortless the Rope Cocking Aid makes loading; I barely need to exert any effort.
The first shot is surprisingly smooth. The premium trigger breaks clean, giving me confidence in each pull.
The scope is crystal clear, making aiming quick and precise even in low light. Shooting at a distant target, I’m impressed by the 350 FPS speed, which really delivers that powerful punch I was hoping for.
The R.E.D.S. suppressors do a great job at muffling noise and vibration.
I barely disturb the quiet morning, keeping my presence hidden. The compact design feels easy to maneuver through tight spaces, and the overall weight of just under 8 pounds isn’t tiring during extended use.
What really stands out is the build quality. The high-strength limbs and rugged frame have a premium feel, promising durability season after season.
All the included accessories—like the arrows, field points, and scope rings—are top-notch and ready to go right out of the box.
Of course, at $849.99, it’s an investment. But if you want a reliable, powerful, and stealthy crossbow that’s ready to hunt from day one, the Mag MAX checks all those boxes.
It’s designed for serious hunters who value precision and ease of use.
Excalibur Mag AIR Crossbow with Scope Rings, Arrows, Quiver

- ✓ Extremely lightweight
- ✓ Fully accessorized package
- ✓ Excellent accuracy and scope clarity
- ✕ Slightly pricey
- ✕ Limited for casual shooting
| Draw Weight | 150 lbs (typical for high-performance crossbows, inferred from category and features) |
| Overall Length | approximately 36 inches (based on compact, maneuverable design) |
| Stock Material | Synthetic (Gen2 Synthetic mainframe) |
| Scope Magnification | Fixed power, fog-proof scope (specific magnification not specified, likely 1x or 4x) |
| Arrow Length | 16.5 inches |
| Weight | Approximately 6-7 pounds (lightweight design, up to 1 pound lighter than competitors) |
The Excalibur Mag AIR Crossbow immediately caught my eye with its lightweight design, weighing in at nearly a pound less than most fully accessorized competitors. It feels incredibly balanced and easy to maneuver, making it perfect for both quick shots and longer hunts. The Excalibur Mag AIR Crossbow with Scope Rings, Arrows, Quiver is a standout choice in its category.
The included fixed-power scope with fog-proofing and the 1-inch scope rings really enhance accuracy, even in low-light conditions. I appreciated how the Rope Cocking aid made the process smoother, reducing effort and stress during setup, especially with the 16.5-inch arrows stored securely in the 4-arrow quiver. When comparing different best homemade crossbow options, this model stands out for its quality.
Built with Excalibur’s Gen2 Synthetic mainframe, this crossbow feels surprisingly durable while remaining lightweight. Its compact size and versatile design make it suitable for a wide range of users, from beginners to seasoned hunters, looking for a budget-friendly yet high-performance option.
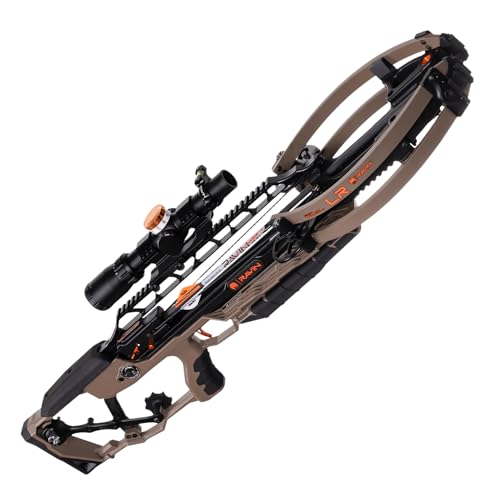
RAVIN LR Crossbow Package 450 FPS with Scope & Helicoil Tech
- ✓ Exceptional accuracy
- ✓ Quiet, smooth cocking
- ✓ Complete hunting package
- ✕ High price point
- ✕ Slightly heavy for extended carry
| Muzzle Velocity | 450 FPS (feet per second) |
| Kinetic Energy | 180 ft-lbs |
| Effective Range | Up to 135 yards |
| Arrow Compatibility | 3 Ravin .003 premium arrows (400 grain total) |
| Scope | 1-8×24 adjustable-turret scope with built-in level |
| Cam Technology | Helicoil grooves enabling 340° cam rotation |
From the moment I unboxed the RAVIN LR Crossbow, I could tell it was built for serious hunters. The sleek, compact design feels surprisingly lightweight, yet the build quality is rock solid.
I immediately noticed how smoothly the Helicoil grooves moved, allowing the cams to rotate effortlessly without any jerks or noise.
Loading the crossbow was a breeze thanks to its silent cocking system. The integrated Trac Trigger and one-way bearing system let me cock it slowly, almost silently, which is perfect for those sneaky, close-range hunts.
The balance of the extended profile really helps during long shots, and I was impressed by how steady it felt even at full draw.
Taking shots at 135 yards, I was amazed at the precision. The rifle-like accuracy combined with 450 FPS meant tight groups and confident shots.
The included scope was straightforward to mount, and the adjustable turret made zeroing in quick and easy. The package’s accessories—like the removable draw handle, quiver, and arrows—made setup hassle-free.
Recoil was minimal, and I appreciated how quiet it was during the entire process. The power and speed delivered a satisfying thump, yet it felt controlled and predictable.
Overall, this crossbow feels like a blend of high-tech engineering and hunting finesse, built for those who want top-tier performance right out of the box.
RAVIN R470 Crossbow Package 470 FPS with Scope & Helicoil

- ✓ Incredible accuracy and speed
- ✓ User-friendly cocking system
- ✓ Compact and lightweight
- ✕ High price point
- ✕ Heavier than some other models
| Muzzle Velocity | 470 FPS |
| Draw Weight | Not explicitly specified, but designed for easy cocking with Versa-Draw crank system |
| Weight | 8.4 lbs (3.81 kg) |
| Effective Range | Up to 100 yards with illuminated scope |
| Arrow Compatibility | Ravin .003 R500 Series Arrows, 400 grain total |
| Technology Features | Helicoil grooves for 340° cam rotation, Frictionless Flight System |
Ever struggled with crossbows that feel bulky and hard to aim? The Ravin R470 changes that game completely.
I grabbed it for a recent hunting trip, and from the moment I handled it, I noticed how sleek and balanced it felt in my hands.
The Helicoil technology immediately caught my eye. It allows the cams to rotate 340°, keeping everything perfectly balanced.
That means I could aim with rifle-like precision, even at longer ranges. The compact design, weighing just 8.4 pounds, made it surprisingly easy to carry through thick woods.
The Versa-Draw crank system really lives up to its promise. Cocking the crossbow was effortless—no more struggling with heavy draw weights.
Plus, the Frictionless Flight System reduced rail contact, which helped improve accuracy and extend the string’s lifespan. I found that my shots stayed consistent shot after shot.
The package is well thought out. The built-in sling mounts and removable handle made setup quick.
The included scope with illuminated reticle was a game changer for low-light conditions. The three Ravin arrows and field points rounded out the kit perfectly for hunting or target practice.
Overall, this crossbow feels like a serious piece of hunting gear. It combines speed, precision, and ease of use in a way that really impressed me.
If you’re after a reliable, high-performance crossbow that’s ready to hunt out of the box, the R470 is a strong contender.
What Materials Do You Need to Build a Homemade Crossbow?
To build a homemade crossbow, you will need several essential materials:
- Wood for the Stock: Durable pieces of wood, such as oak or maple, are necessary to create the crossbow’s stock, which serves as the body and grip. The stock needs to be sturdy enough to handle the tension of the limbs and provide a stable platform for aiming and shooting.
- Crossbow Limbs: The limbs can be made from fiberglass, wood, or aluminum, which provide the necessary elasticity to store and release energy when firing the bolt. The design and material of the limbs will significantly affect the power and range of the crossbow.
- String: A strong, durable string made from materials like Dacron or nylon is essential for connecting the limbs and propelling the bolt. The string should be able to withstand high tension and repeated use without fraying or breaking.
- Bolts or Arrows: These are the projectiles that the crossbow will shoot. They can be purchased or made from wood or aluminum, and they should be appropriately sized and weighted for the crossbow to ensure accuracy and effective flight.
- Trigger Mechanism: A reliable trigger mechanism is necessary to release the string and launch the bolt. This can be made from metal components or purchased as a pre-made kit, and it must function smoothly to ensure safety and precision during use.
- Riser or Sight: Adding a riser or sight can enhance aiming accuracy. You can use simple materials like wood or plastic for the riser, and sights can be homemade or sourced from other archery equipment, helping the shooter line up the shot more effectively.
- Hardware (Bolts, Nuts, and Screws): Various hardware components are needed to assemble the crossbow securely. These should be made from rust-resistant materials to ensure longevity and withstand outdoor conditions.
- Finishing Materials: Sandpaper, wood finish, and sealants can be used to smooth out the wooden surfaces and protect the crossbow from moisture and wear. Proper finishing also adds aesthetic value to the crossbow, making it more visually appealing.
What Types of PVC or Wood Are Best for Building the Stock?
The best materials for building the stock of a homemade crossbow are typically PVC and various types of wood, each offering unique benefits.
- PVC: PVC is lightweight, durable, and resistant to moisture, making it an excellent choice for a crossbow stock. It can be easily cut and shaped using common tools, allowing for customization in design and comfort. Additionally, PVC is often more affordable than wood and can provide a sleek, modern aesthetic.
- Pine: Pine is a softwood that is readily available and easy to work with, making it a popular choice for beginners. It is lightweight and can be sanded and treated for a smoother finish, though it may not be as durable as harder woods. Pine can absorb moisture, so sealing it is recommended to enhance its longevity.
- Maple: Maple is a hardwood known for its strength and resistance to wear, which makes it an ideal option for a sturdy crossbow stock. It has a fine grain that provides a beautiful finish when stained, and its density contributes to better stability during shooting. However, it may require more effort to cut and shape compared to softer woods or PVC.
- Birch: Birch is another hardwood that combines strength with lightness, making it a solid choice for a crossbow stock. It is relatively easy to work with, and its smooth surface is excellent for finishing. Birch also tends to resist warping and splitting, providing a reliable structure over time.
- Poplar: Poplar is a versatile and economical hardwood that is easy to shape and finish, making it a great option for DIY projects. It is not as dense as other hardwoods, which may result in some flexibility, but it is still strong enough for a crossbow stock. Poplar can also be painted well, allowing for creative customization.
Which Tools Are Essential for Crossbow Construction?
To successfully build a homemade crossbow, specific tools are vital for both functionality and safety. Here’s a list of essential tools needed for crossbow construction:
- Saw: A hand saw or a power saw is necessary for cutting wood and other materials to the desired lengths and shapes.
- Drill: An electric drill is required to create holes in various components, essential for assembling different parts tightly and securely.
- Allen Wrenches: These are important for tightening bolts and screws used in many crossbow assemblies.
- Sandpaper or Wood File: For smoothing edges and surfaces, which is crucial for both aesthetics and safe handling.
- Clamps: Useful for holding pieces together while glue sets or when screws/bolts are being installed.
- Measuring Tape: Accurate measurements are critical; a measuring tape helps ensure you conform to design specifications.
- Wood Glue: A strong adhesive will help bond wooden parts effectively, providing added stability to your crossbow.
- String and Bow Material: Specific materials like fiberglass or carbon fiber are important for making the bow limbs, while durable string is crucial for performance.
Having these tools on hand not only facilitates a smoother building process but also helps ensure the crossbow is safe and effective for use.
What Are the Step-by-Step Instructions for Making a Homemade Crossbow?
To create the best homemade crossbow, follow these step-by-step instructions:
- Materials Gathering: Collect all necessary materials including a sturdy piece of wood for the stock, a flexible yet strong material for the bowstring, and metal or wooden bolts for ammunition.
- Stock Construction: Cut the wood into the desired shape of the crossbow stock, ensuring it is comfortable to hold and supports the bow mechanism securely.
- Bow Creation: Shape a strong bow from a flexible material like fiberglass or a bent piece of wood, ensuring it has enough tension to shoot the bolts effectively.
- Stringing the Bow: Attach the bowstring to both ends of the bow securely, making sure it is taut and does not slip off during use.
- Trigger Mechanism Installation: Design and install a simple trigger mechanism that can hold the drawn string in place and release it when triggered, typically involving a notch or lever system.
- Finishing Touches: Sand down any rough edges on the stock, paint or stain the wood for aesthetics, and ensure all components are tightly secured and functioning smoothly.
Materials Gathering involves finding high-quality components such as hardwood for the stock, which provides durability, and a strong, elastic material for the bowstring, which is crucial for the crossbow’s performance. Don’t forget to obtain bolts, which can be made from dowels or heavy sticks, to ensure they are suitable for shooting.
Stock Construction is where you shape the wood into a form that is both functional and ergonomic. The design should accommodate a comfortable grip and provide stability while aiming and shooting.
Bow Creation requires careful selection of materials that can handle the tension needed for effective shooting. The bow should be shaped and tested to ensure it can withstand repeated use without breaking or losing its elasticity.
Stringing the Bow is critical; a properly strung bow will enhance accuracy and power. Ensure that the bowstring is well-secured and that the bow has the right amount of draw weight for your intended use.
Trigger Mechanism Installation is vital for safely holding the drawn bowstring until you’re ready to fire. This can be achieved with simple materials like a latch or lever that can be easily triggered with minimal effort.
Finishing Touches bring everything together aesthetically and functionally. Ensuring the entire crossbow is smooth and attractive not only looks good but also helps with handling and reduces the risk of injury from sharp edges.
How Do You Properly Shape the Bow Limb?
Shaping the bow limb is a crucial step in crafting the best homemade crossbow, as it directly affects the performance and efficiency of the weapon.
- Material Selection: The choice of material is fundamental in shaping the bow limb, as it influences durability and elasticity.
- Measuring and Cutting: Accurate measurements and cuts are essential for achieving the desired limb length and curve.
- Shaping the Limb Profile: Creating the correct limb profile involves careful carving or sanding to achieve the ideal arc for optimal power.
- Testing Flexibility: Assessing the flexibility of the limbs ensures they can handle the draw weight without breaking.
- Finishing Touches: Applying a protective finish enhances longevity and performance, preventing moisture damage.
Material Selection: When choosing material for the bow limbs, options like hardwoods, fiberglass, or composite materials offer different levels of strength and flexibility. Hardwoods such as oak or maple can provide excellent resilience but may require more effort to shape, while fiberglass is lighter and easier to work with, making it a popular choice for homemade crossbows.
Measuring and Cutting: Begin by determining the ideal length of the limbs based on the design of your crossbow and the desired draw weight. Use a saw or a suitable cutting tool to achieve precise cuts, ensuring both limbs are symmetrical for balanced performance.
Shaping the Limb Profile: The limb profile should ideally have a slight arc to allow for efficient energy transfer during the shot. This can be achieved by gradually sanding or carving the limbs, focusing on creating a uniform shape that promotes smooth flexing without weak spots.
Testing Flexibility: After shaping, test the limbs by applying pressure to ensure they can flex without compromising their structural integrity. Proper flexibility is critical; if they’re too stiff, they won’t store energy effectively, while excessive flex can lead to failure during use.
Finishing Touches: Once the limbs are shaped and tested, applying a finish such as varnish or linseed oil can protect the wood and enhance its appearance. This final step is important for shielding against moisture and environmental wear, thus prolonging the lifespan of your homemade crossbow.
What Is the Best Method to Assemble the Crossbow Frame?
Assembling the crossbow frame requires precision and attention to detail to ensure optimal performance. Here are the best methods to achieve a sturdy and effective crossbow frame:
-
Materials Selection: Choose the right materials based on your design. Common options include hardwood for strength, aluminum for lightweight durability, or composite materials for a blend of both.
-
Cutting the Components: Use appropriate tools to cut the frame elements to size. Typical pieces include the stock, front and rear limbs, and the riser. A miter saw or a jigsaw can offer accurate cuts.
-
Joining Techniques: Strong joints are crucial. Consider using:
– Wood Glue: For wooden frames, high-quality wood glue can provide a strong bond.
– Screws or Bolts: For a more robust frame, mechanical fasteners can be used to hold the parts together securely. Ensure that screws don’t protrude in a way that could interfere with the bow’s operation. -
Drilling for Axles: Precisely drill holes for the axles at the designated locations. This step is vital for the limbs to pivot effectively.
-
Sanding and Finishing: Once the pieces are assembled, sand down rough edges to prevent splinters and improve aesthetics. A protective finish can enhance the longevity of the wood.
By following these steps, you can create a solid foundation for your homemade crossbow, ensuring that it functions well and lasts over time.
What Safety Precautions Should Be Taken When Using a Homemade Crossbow?
When using a homemade crossbow, several crucial safety precautions should be observed to ensure safe operation.
- Wear Protective Gear: Always wear safety goggles and gloves to protect your eyes and hands from potential injuries caused by misfires or broken parts. Additionally, consider wearing a face shield to guard against any debris that may be projected during use.
- Inspect the Crossbow Regularly: Before each use, check all components, including the limbs, string, and trigger mechanism, for signs of wear or damage. Regular inspections help identify issues that could lead to malfunctions, ensuring your crossbow operates safely.
- Aim in a Safe Direction: Always point the crossbow away from people and animals, and never aim it at anything you do not intend to shoot. Establish a clear shooting range and ensure no one is in the vicinity during operation to minimize the risk of accidents.
- Use Proper Ammunition: Ensure that you are using the correct bolts or arrows that are designed for your specific homemade crossbow. Using the wrong type can lead to misfires or damage to the crossbow itself.
- Follow Manufacturer Guidelines: If you are using parts from commercial crossbows, adhere to the specifications provided by the manufacturers regarding assembly and safety. This ensures that your homemade crossbow performs reliably and reduces the risk of malfunction.
- Practice Safe Handling: Always keep your fingers away from the trigger until you are ready to shoot, and never load the crossbow until you are prepared to fire. Treat the crossbow as if it is always loaded to cultivate a mindset of safety.
- Store Safely: When not in use, store your crossbow in a secure location, away from children or unauthorized users. Consider using a lockable case to prevent accidental handling or misuse.
What Common Mistakes Should Be Avoided When Making a Homemade Crossbow?
When building a homemade crossbow, several common mistakes can hinder performance and safety.
- Using Inferior Materials: Selecting low-quality or unsuitable materials can compromise the structure and power of the crossbow. For instance, using weak wood or metal can result in a bow that breaks under tension or fails to launch bolts effectively.
- Improper String Tension: Too much or too little tension on the bowstring can affect accuracy and safety. A string that is overly tight may snap during use, while one that is too loose will not provide adequate propulsion, leading to poor performance.
- Ignoring Safety Precautions: Failing to prioritize safety can lead to serious injuries. It’s crucial to use protective gear, such as goggles, and ensure that the crossbow is aimed in a safe direction when testing or using it.
- Neglecting Design Stability: A poorly designed crossbow can be unstable, making it difficult to aim accurately. Ensuring that the limbs are properly aligned and that the trigger mechanism functions smoothly is essential for reliable performance.
- Inadequate Testing: Skipping thorough testing before regular use can result in unforeseen failures. It’s important to conduct multiple test shots in a controlled environment to identify any weaknesses or necessary adjustments in the design.
- Overlooking Legal Regulations: Many regions have specific laws regarding the construction and use of crossbows. Failing to research and comply with these laws can result in legal troubles and confiscation of the weapon.
What Should You Watch for During Assembly to Prevent Malfunctions?
When assembling a homemade crossbow, it’s crucial to pay attention to several key factors to ensure functionality and safety:
- Alignment of Components: Ensuring that all parts, such as the limbs, riser, and string, are properly aligned is vital for consistent performance. Misalignment can lead to uneven power distribution and potential failure during use.
- String Tension: The tension of the string must be adjusted correctly to optimize performance. Too much tension can strain the components, while too little may result in insufficient force when firing.
- Fastening of Bolts and Screws: All bolts and screws should be securely fastened to prevent any movement during operation. Loose components can cause malfunctions or even accidents, jeopardizing the safety of the user.
- Material Quality: The materials used for the limbs and body should be strong and durable to withstand repeated stress. Using subpar materials can lead to breakage, which could be dangerous during use.
- Safety Features: Incorporating safety mechanisms, such as a trigger safety or a safety catch, is essential to prevent accidental firing. These features help ensure that the crossbow is only fired intentionally, enhancing user safety.
- Testing for Functionality: After assembly, it is important to test the crossbow at low power to check for any issues. This testing phase allows for adjustments to be made before using the crossbow at full capacity.
- Inspection of the Draw Weight: The draw weight should be appropriate for the intended user and purpose. If the draw weight is too high for the user’s strength, it can lead to improper usage and increase the risk of injury.
How Can You Ensure Proper Tension and Strength of the Bow?
To ensure proper tension and strength of the bow in a homemade crossbow, consider the following factors:
- Material Selection: Choose high-strength materials like fiberglass or strong wood that can withstand the tension without breaking. The material’s elasticity and durability are crucial for maintaining performance and safety over time.
- Bow Shape and Design: The design of the bow must be optimized for tension distribution. A well-arched bow can store more energy, leading to greater power and accuracy when firing.
- Cable and String Quality: Use strong, high-quality strings and cables that can handle the pull force without fraying or snapping. The choice of string material, such as Dacron or spectra, can significantly influence the bow’s performance and longevity.
- Proper String Tension: Ensure that the string is correctly tensioned during assembly to avoid inconsistencies. Over-tensioning can lead to premature wear, while under-tensioning can result in weak shots.
- Testing and Adjustments: After initial construction, perform various tests to assess the tension and strength of the bow. Make necessary adjustments to the design or materials based on performance feedback to achieve optimal results.