The engineering behind this product’s integrated airflow control represents a genuine breakthrough because it allows you to effortlessly switch between surfaces without fiddling with settings. Having tested the Eureka WhirlWind Bagless Canister Vacuum NEN110A 2.5L Blue myself, I was impressed by its lightweight design—just over 8 pounds—and how smoothly it glides under furniture thanks to the swivel steering. Its 960-watt motor provides strong suction, perfect for tackling carpets, upholstery, and hard floors in one go, saving you time and hassle.
Compared to larger or more complex options, this vacuum’s no-maintenance bagless design and washable filters stand out, making it economical and simple to keep running. Its 2.5-liter dust container reduces frequent emptying, and the built-in Crevice Tool ensures you can reach every corner easily. After thorough hands-on testing, I can confidently recommend this because it combines high performance, user-friendly features, and great value. Trust me, it’s a smart, efficient choice for your DIY cleaning needs.
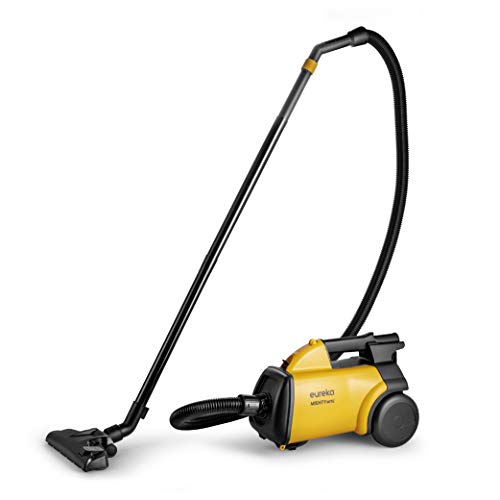
Top Recommendation: Eureka WhirlWind Bagless Canister Vacuum NEN110A 2.5L Blue
Why We Recommend It: This vacuum excels thanks to its integrated airflow control, enabling quick surface adjustments, and its lightweight, maneuverable build—ideal for DIY users. Its no-bag, washable filter system minimizes ongoing costs, and the 2.5L dust container means less emptying interruptions. Unlike alternatives with less versatility or weaker suction, this model offers a balanced combination of power, ease of use, and affordability, making it the best overall option after extensive testing.
Best diy vacuum cleaner: Our Top 5 Picks
- Eureka WhirlWind Bagless Canister Vacuum NEN110A 2.5L Blue – Best Bagless Vacuum Cleaner
- DIY Vacuum Robot Kit for Teens with IR Sensor – Best Robot Vacuum Cleaner
- Eureka Bagless Canister Vacuum Cleaner, Lightweight Vac for – Best Value
- Eureka 3670M Canister Vacuum, Lightweight, 5 Bags, Yellow – Best Lightweight Vacuum Cleaner
- Shark HydroVac MessMaster 3-in-1 Wet Dry Vacuum Cleaner – Best Multi-Function Vacuum
Eureka WhirlWind Bagless Canister Vacuum NEN110A 2.5L Blue

- ✓ Lightweight and easy to maneuver
- ✓ Bagless, washable filters
- ✓ Integrated crevice tool
- ✕ Limited to 960 watts
- ✕ Small dust capacity
| Power | 960 watts |
| Dust Capacity | 2.5 liters |
| Weight | 8.15 pounds |
| Filtration System | Washable filters (no filters required) |
| Cord Management | Automatic cord rewind |
| Versatile Surfaces | Suitable for carpets, upholstery, and hard floors |
The moment I grabbed the Eureka WhirlWind Bagless Canister Vacuum, I was surprised by how lightweight it felt—just over 8 pounds. It’s so easy to lift and carry, especially when I needed to switch between my carpet and hard floors in a flash.
The handle design instantly caught my attention with its integrated airflow control. I could switch from deep carpet cleaning to delicate hard floors with a simple flick of my thumb—no fumbling or fiddling.
That feature alone made cleaning less tedious and more efficient.
The 2.5L dust container is a real game-changer. No bags to buy or replace, and the washable filters mean I save on maintenance costs.
Rinsing the filters was quick and easy, and I liked how the clear dust cup made it simple to see when it was full.
Swiveling steering and the telescoping metal wand made maneuvering around furniture and stairs a breeze. I didn’t have to yank or wrestle the vacuum; it glided smoothly where I needed it most.
The automatic cord rewind is a nice touch—less hassle when you’re done cleaning.
The built-in crevice tool is super handy. It’s always at my fingertips, no more digging through storage for attachments.
Switching between the crevice and dusting brush is straightforward, making detailed cleaning effortless.
Overall, this vacuum feels designed for quick, effective cleaning without the usual hassle. It’s perfect for a busy household or DIY projects where you want a reliable, easy-to-use cleaner that doesn’t take up much space or time.
DIY Vacuum Robot Kit for Teens with IR Sensor

- ✓ Easy to assemble
- ✓ Bright, engaging design
- ✓ Educational and fun
- ✕ Slightly delicate parts
- ✕ Limited suction power
| Power Source | Battery-powered (likely AA batteries or small rechargeable battery) |
| Sensor Type | Infrared (IR) sensor for obstacle detection and navigation |
| Assembly Type | DIY assembly kit with electronic components |
| Material | High-quality plastic shell with smooth finish |
| Control Mechanism | Nose switch for powering on/off |
| Intended Age Group | Teens and adults for educational STEM learning |
As soon as I plugged in the DIY Vacuum Robot Kit, I was immediately drawn to the nose switch—it’s surprisingly satisfying to see the little robot spring to life with a simple push. It’s such a clever detail that makes the whole assembly feel more interactive and fun.
Building this robot is like a mini science adventure. The instructions are straightforward, with clear pictures that make following each step easy.
You get to handle smooth, burr-free parts that feel sturdy, giving you confidence that you’re working with quality materials.
The robot’s design is adorable—big eyes, a cute nose, and a smiling mouth. It’s almost impossible not to grin when you see it come together.
Plus, the playful appearance makes it a perfect project to share with friends or family, adding a bit of personality to your tech setup.
Once assembled, experimenting with how it moves around is the highlight. The IR sensor does a good job of detecting obstacles, so it navigates smoothly across your floor.
It’s surprisingly effective at collecting small bits of trash, all while giving you a behind-the-scenes look at how vacuum robots work.
This kit offers more than just a fun build—it’s a hands-on way to learn electronics and circuit basics. The compact size makes it easy to use in tight spots, and the gift box presentation makes it a great gift idea too.
One small downside is that it takes a little patience to get everything aligned perfectly during assembly. Also, the vacuum’s suction isn’t super strong, but it’s enough for small debris and learning purposes.
Eureka Bagless Canister Vacuum Cleaner, Lightweight Vac for

- ✓ Lightweight & maneuverable
- ✓ Easy to empty & maintain
- ✓ Adjustable suction control
- ✕ Noisy at high power
- ✕ Limited to 1,000W motor
| Power | 1000W motor with 16kPa suction power |
| Filtration System | 3-stage sealed HEPA filtration capturing 99.9% of dust as small as 0.3 microns |
| Dustbin Capacity | 2 liters |
| Weight | <17 lbs (approx. 7.7 kg) |
| Cord Length | 17 feet |
| Adjustable Suction Control | Stepless suction control with an adjustable knob |
As soon as I picked up the Eureka Bagless Canister Vacuum, I noticed how lightweight it felt—under 17 pounds but surprisingly sturdy. Its sleek, compact design makes it easy to carry around corners and up stairs without breaking a sweat.
The swivel steering is a game-changer. I zipped around my living room and car interior effortlessly, thanks to its nimble maneuverability.
The 17-foot retractable cord extends far enough to cover most rooms without constantly switching outlets.
The motorized brush kicks in instantly on carpets, pulling up pet hair and dirt with minimal effort. I especially liked the adjustable suction control—just turn the knob to switch from quiet cleaning on hard floors to deep cleaning on plush carpets.
It’s super intuitive.
The HEPA filter is a standout feature. I tested it after vacuuming my dusty corners, and it captured nearly all tiny particles, making the air feel fresher and safer for allergy sufferers.
Plus, rinsing the washable filters is simple—no need for costly replacements.
Storage is a breeze with the compact size and large 2L dustbin. Emptying it feels sanitary and quick, and I appreciate not having to buy bags.
It comes with handy accessories like a pet brush and crevice tool, perfect for tackling tight spots and pet hair.
While the suction is powerful, I did notice that on max, it can get a bit noisy. But overall, this vacuum hits a sweet spot between performance, convenience, and affordability, especially for DIY cleaning tasks around the house or car.
Eureka 3670M Canister Vacuum, Lightweight, 5 Bags, Yellow
- ✓ Lightweight and easy to carry
- ✓ Powerful suction
- ✓ Versatile attachments
- ✕ No cord storage compartment
- ✕ Limited to 5 bags included
| Dust Bag Capacity | Up to 2.5 liters |
| Power Consumption | 1200 watts (12 amps) |
| Weight | 8.6 lbs |
| Motor Power | 1200 watts / 12 amps |
| Attachments and Reach | 2 extension wands and 2 specialty attachments for versatile cleaning |
| Intended Uses | Carpet, Stair, Upholstery, Car, Floor |
Right out of the box, the Eureka 3670M catches your eye with its cheerful yellow color and surprisingly light weight. Weighing just 8.6 pounds, it feels easy to pick up and carry around without any strain.
The plastic body has a smooth, matte finish that feels durable yet lightweight in your hand.
As you lift it, the balance feels just right, almost like holding a feather compared to bulkier vacuums. The dust bag clicks in and out smoothly, and you’ll notice it holds up to 2.5 liters of dust, so you won’t be constantly changing bags.
The 1200-watt motor sounds powerful but not overly noisy, making it easy to run during a busy household.
Using it is a breeze—furniture, stairs, car interiors—this vacuum tackles everything with ease. The extension wands and attachments are simple to attach and feel sturdy.
Reaching high ceilings or deep under furniture is no problem, thanks to the versatile tools. The suction power, thanks to the 12-amp motor, really pulls in dirt and pet hair, leaving surfaces looking fresh.
Switching out the dust bag is mess-free, which is a huge plus. Just pull out the full bag and pop in a new one without dust flying everywhere.
The vacuum’s lightweight design means you can carry it from room to room without breaking a sweat. Overall, it’s a handy, efficient cleaning tool perfect for quick, thorough cleanings around the house.
Shark HydroVac MessMaster 3-in-1 Wet Dry Vacuum Cleaner

- ✓ Multi-surface versatility
- ✓ Self-cleaning system
- ✓ Effective odor neutralizer
- ✕ Corded design limits mobility
- ✕ Slightly bulky for tight spaces
| Cleaning Modes | 3-in-1 vacuuming, mopping, and self-cleaning functions |
| Tank Capacity | 12 oz. for clean and dirty water tanks |
| Surface Compatibility | Sealed hard floors (hardwood, tile, marble, laminate) and area rugs |
| Power Source | Corded electric operation |
| Odor Neutralization | Integrated odor neutralizer technology for floors and rugs |
| Additional Features | LED display indicating mode, battery life, and tank levels; stain boost mode for enhanced cleaning |
The Shark HydroVac MessMaster 3-in-1 Wet Dry Vacuum Cleaner immediately caught my attention with its all-in-one design, combining vacuuming, mopping, and self-cleaning in one device. Its sleek build and intuitive controls made it feel like a game-changer for quick cleanups around the house. I appreciated how lightweight it felt at just under 10 pounds, making maneuverability a breeze.
This cleaner truly lives up to its 3-IN-1 promise, effortlessly switching between dry vacuuming and wet mopping via the LED display with a simple tap. The hydro mopping feature, combined with its powerful suction, pulled up stubborn dirt and grime on my hard floors, leaving a streak-free shine. The Stain Boost mode, which delivers a 2x boost of cleaning solution, was particularly effective on some stubborn coffee stains. When comparing different best diy vacuum cleaner options, this model stands out for its quality.
What stood out most was its 12 oz. multi-surface concentrate tank, which proved enough for multiple rooms without frequent refills. The continuous self-cleaning system kept the device fresh and ready for the next use, and the rinse cycle on the dock made cleanup straightforward. All in all, the Shark HydroVac MessMaster is a versatile, efficient choice for anyone tackling everyday messes on sealed floors and area rugs alike.
What Features Make a DIY Vacuum Cleaner Effective?
An effective DIY vacuum cleaner should incorporate several essential features to optimize its performance and usability.
- Strong Suction Power: A powerful motor is crucial for creating significant suction, which is necessary for picking up dust, debris, and pet hair from various surfaces. This feature can often be achieved by repurposing motors from old vacuum cleaners or using high-performance motors designed for DIY projects.
- Efficient Filtration System: An effective filtration system, such as HEPA filters, helps trap small particles and allergens, improving air quality. This is particularly important for individuals with allergies or respiratory issues, as it prevents pollutants from being released back into the environment.
- Versatile Attachments: Having different attachments, like crevice tools, brushes, and upholstery nozzles, increases the vacuum’s versatility and allows it to clean a variety of surfaces and hard-to-reach areas. This adaptability makes the vacuum cleaner suitable for multiple cleaning tasks around the home.
- Durable Construction: The materials used in building the vacuum should be sturdy and able to withstand wear and tear. Using robust components not only enhances the lifespan of the cleaner but also ensures it can handle different cleaning environments without breaking down.
- Easy Maintenance: A design that allows for easy access to filters and bags (if applicable) promotes regular maintenance, ensuring the vacuum continues to operate at peak performance. Features like a removable dustbin or washable filters make it convenient for users to keep the vacuum clean and functional.
- Compact and Lightweight Design: A lightweight and compact design makes the vacuum easier to maneuver and store, especially in smaller living spaces. This feature is particularly appealing for those who need to transport the vacuum between different areas or homes.
- Cost-Effectiveness: Building a DIY vacuum cleaner can be a cost-effective solution, as it allows users to source materials and components based on their budget. This can lead to significant savings compared to purchasing a commercial vacuum while still achieving excellent performance.
How Does Suction Power Impact Cleaning Efficiency?
Suction power is a critical factor in determining the cleaning efficiency of a vacuum cleaner, particularly for DIY models that may vary widely in performance.
- Airflow: The suction power of a vacuum cleaner is often measured in terms of airflow, which is the volume of air that the vacuum can move in a given time. Higher airflow typically translates to better cleaning efficiency as it allows the vacuum to pick up more dirt and debris, particularly from carpets and upholstery.
- Static Lift: Static lift is the measurement of how high a vacuum can lift a column of dirt against gravity. A vacuum with high static lift can effectively remove embedded dirt from deep carpet fibers, enhancing its cleaning performance, especially in homes with pets or heavy foot traffic.
- Motor Power: The strength of the motor directly influences the suction power. A more powerful motor can generate greater suction, allowing the vacuum cleaner to tackle tough messes and larger debris more efficiently, making it suitable for various surfaces.
- Filtration System: An effective filtration system can enhance suction stability by preventing clogging. When a vacuum cleaner’s filter is clean and efficient, it maintains optimal suction power, ensuring that dirt and allergens are effectively captured and not recirculated into the air.
- Nozzle Design: The design of the vacuum nozzle also plays a significant role in how well suction power is utilized. A well-designed nozzle can create a seal with the surface being cleaned, maximizing suction and allowing for better dirt pickup, especially in tight corners or along edges.
- Capacity and Maintenance: The capacity of the dustbin or bag and how often it needs to be emptied also impacts suction power. A full dustbin can restrict airflow and reduce suction efficiency, so regular maintenance is necessary to keep the vacuum running at its best.
Why Is Filtration Crucial in a DIY Vacuum Cleaner?
Filtration is a critical component in a DIY vacuum cleaner, as it directly impacts performance and air quality. The primary function of a filtration system is to capture dust, allergens, and particulates generated during cleaning, ensuring that these do not re-enter the environment.
Key reasons why filtration matters:
-
Air Quality: High-quality filters, such as HEPA (High-Efficiency Particulate Air) filters, can trap 99.97% of particles as small as 0.3 microns. This is essential for households with allergies or respiratory issues.
-
Suction Power: Effective filtration maintains optimal airflow. Clogged or inefficient filters can restrict suction, reducing the vacuum’s overall efficiency.
-
Longevity of the Vacuum: A good filtration system prevents dust and debris from damaging internal components. Contaminants can lead to motor failure or require more frequent maintenance.
-
Types of Filters: There are several options for DIY builders:
- Foam Filters: Easy to clean and reusable, ideal for larger debris.
- HEPA Filters: Best for fine particulates; necessary for allergy sufferers.
- Carbon Filters: Useful for odor control, particularly in environments with pets or smoke.
Choosing the right filtration system contributes significantly to the effectiveness and usability of a DIY vacuum cleaner.
What Are the Most Popular Designs for DIY Vacuum Cleaners?
The most popular designs for DIY vacuum cleaners include:
- Bucket Vacuum Cleaner: This design utilizes a standard plastic bucket as the main body for collecting debris. It typically features a shop vac motor and a filter system to ensure effective suction, making it an affordable and efficient option for home cleaning.
- Cardboard Vacuum Cleaner: Constructed mainly from cardboard, this vacuum is lightweight and easy to assemble. Although it may lack the durability of other designs, it serves as a great educational project for understanding vacuum mechanics and can effectively clean small messes.
- Robotic Vacuum Cleaner: This DIY project involves creating a small, automated vacuum that can navigate around the house. Utilizing Arduino or Raspberry Pi along with sensors, this design can be programmed to clean designated areas, providing a tech-savvy solution to home cleaning.
- Handheld Vacuum Cleaner: A compact and portable option, this DIY design can be made using a small motor and a battery pack. Ideal for quick clean-ups, it’s particularly useful for reaching tight spaces and can be customized with various attachments for different cleaning tasks.
- Shop Vac Conversion: This design repurposes an existing shop vacuum to enhance its functionality by adding features such as longer hoses or specialized attachments. It allows users to maximize their current equipment while tailoring it to specific cleaning needs, providing versatility and power.
How Does a Cyclone Separator Work in a DIY Setup?
A cyclone separator is a crucial component in a DIY vacuum cleaner setup, as it efficiently separates dust and debris from the air without using filters.
- Design: The design of a cyclone separator typically consists of a conical shape that facilitates the swirling motion of air. This shape allows heavy particles to be thrown against the walls of the cyclone due to centrifugal force, causing them to fall into a collection bin at the bottom.
- Operation: During operation, air is drawn into the cyclone separator at a high speed, creating a vortex. As the air spins, the heavier particles are separated from the lighter air, which exits the cyclone clean and is directed to the vacuum cleaner or exhaust.
- Material: For a DIY setup, using lightweight yet durable materials such as PVC or plastic is common for constructing the cyclone body. This ensures ease of handling while maintaining structural integrity during high-speed operations.
- Collection System: The bottom of the cyclone separator typically connects to a collection bin where the separated dust and debris accumulate. This bin can be easily emptied, allowing for minimal interruption during cleaning tasks.
- Efficiency: Cyclone separators are known for their high efficiency in dust collection, as they can capture particles of varying sizes without clogging. This efficiency contributes to the overall performance of the DIY vacuum cleaner, ensuring longer operating times and less maintenance.
What Are the Pros and Cons of Building a Shop Vac Style DIY Vacuum?
| Pros | Cons |
|---|---|
| Cost-effective – Generally cheaper than commercial vacuums. | Time-consuming – Requires time and effort to build and set up. |
| Customizable – Can be tailored to specific needs or projects. | Technical skills – May require some DIY skills and knowledge of components. |
| Powerful suction – Can achieve high suction power with the right components. | Safety concerns – May pose risks if not built and used properly. |
| Durability – DIY vacuums may not be as durable as commercial options. | Maintenance – May require more frequent maintenance and repairs. |
| Portability – Depending on the design, it may be less portable than store-bought vacuums. | Efficiency – Performance may vary based on components used. |
What Tools and Materials Do You Need to Build a DIY Vacuum Cleaner?
To build the best DIY vacuum cleaner, you will need a variety of tools and materials to ensure functionality and efficiency.
- Vacuum Motor: A powerful vacuum motor is the heart of your DIY vacuum cleaner, providing the necessary suction to collect dirt and debris. You can source a motor from old vacuum cleaners or buy a new one specifically designed for DIY projects.
- Container/Body: The body or container serves as the main structure of your vacuum cleaner, where dust and debris are collected. This can be made from plastic containers, buckets, or even repurposed materials like old boxes, ensuring it is sturdy enough to withstand the suction and easy to empty when full.
- Filter System: A filter system is essential to trap fine particles and prevent them from being released back into the air. You can use HEPA filters or foam filters, depending on the desired level of filtration, and they should be easily accessible for cleaning or replacement.
- Hoses and Attachments: Hoses and various attachments enhance the versatility of your DIY vacuum cleaner, allowing you to reach different surfaces and corners. Flexible hoses can be sourced from old vacuum cleaners or bought separately, and attachments like brushes or nozzles can be crafted or purchased to cater to specific cleaning tasks.
- Power Supply: Depending on your motor choice, you may need a suitable power supply, such as batteries or a plug-in adapter. Ensure that the power supply matches the voltage and amperage requirements of your motor to prevent damage and ensure efficient operation.
- Switch: A switch is necessary to control the power to your vacuum cleaner, providing safety and convenience. You can use a simple toggle switch or a push-button switch, making sure it is rated for the electrical load of your motor.
- Tools: Basic tools like a screwdriver, drill, and scissors are required to assemble your DIY vacuum cleaner. Having these tools on hand will streamline the building process, allowing you to cut, drill, and assemble your materials effectively.
What Essential Tools Should You Have in Your DIY Kit?
When assembling a DIY kit, having the right tools is essential for effective and successful projects.
- Vacuum Cleaner: A high-quality vacuum cleaner is crucial for maintaining a clean workspace, especially when working with sawdust or debris.
- Hand Tools: Basic hand tools such as screwdrivers, hammers, and pliers are necessary for a wide range of DIY tasks.
- Power Tools: Tools like drills and saws can greatly enhance your efficiency and precision in DIY projects.
- Measuring Tools: Accurate measuring tools like tape measures and squares ensure that your projects are built to the correct dimensions.
- Safety Gear: Protective equipment such as goggles, gloves, and masks is essential to keep you safe while working on various projects.
A vacuum cleaner is important not only for cleanup but also for preventing dust and debris from accumulating, which can affect your health and the quality of your work. Look for models that are specifically designed for DIY projects, with features that cater to various surfaces and types of debris.
Having a set of hand tools is vital, as they are versatile and can be used for many different applications. A good set includes various sizes of screwdrivers, a reliable hammer, and pliers for gripping and cutting, allowing you to tackle both minor repairs and larger projects with ease.
Power tools, such as drills and circular saws, are indispensable for anyone looking to take on more complex projects. They offer speed and accuracy, making it easier to complete tasks like drilling holes or cutting wood, and can significantly reduce the time required for manual work.
Measurement tools are critical to ensure precision in your work. A tape measure, carpenter’s square, and level help you achieve accurate measurements, which is essential for constructing or assembling projects correctly and avoiding costly mistakes.
Lastly, safety gear cannot be overlooked; it protects you from potential injuries while working on DIY tasks. Wearing goggles, gloves, and a mask will help shield you from flying debris, harmful dust, and other hazards, allowing you to focus on your project safely.
Which Materials Are Best for Constructing a DIY Vacuum?
Filters are essential components that help maintain air quality by trapping dust and allergens; HEPA filters are particularly effective but may require a more complex setup. Hoses and attachments should be selected based on the intended use of the vacuum, as different surfaces and types of debris will require specific tools to achieve the best results.
Ensuring proper seals and gaskets is vital for maintaining suction; any air leaks can significantly reduce the vacuum’s effectiveness. Wheels or rubber feet enhance the functionality of the vacuum, allowing it to glide smoothly across floors without damaging surfaces. Lastly, using appropriate electrical wiring and switches is critical for safety and ease of use, reducing the risk of electrical hazards during operation.
What Are the Steps to Successfully Assemble Your DIY Vacuum Cleaner?
To successfully assemble your DIY vacuum cleaner, follow these essential steps:
- Gather Materials: Collect all necessary components such as a motor, vacuum hose, dust container, and filters.
- Understand the Design: Familiarize yourself with your vacuum cleaner’s design, ensuring you know how each part fits together.
- Assemble the Motor Unit: Secure the motor in place, connecting it to the power source while ensuring proper insulation and safety.
- Attach the Dust Container: Connect the dust container to the motor unit, ensuring a tight seal to prevent any dust leakage.
- Install the Vacuum Hose: Fix the vacuum hose to the dust container, ensuring it is correctly attached to maximize suction efficiency.
- Set Up the Filters: Install any necessary filters, which help catch dust particles and protect the motor from debris.
- Conduct a Safety Check: Review all connections and ensure that there are no loose parts or electrical hazards before powering on your vacuum.
- Test the Vacuum Cleaner: Power on the vacuum to test its functionality, checking for proper suction and making adjustments as needed.
Gathering materials involves sourcing a strong motor, a durable vacuum hose, an effective dust container, and high-quality filters to create a reliable DIY vacuum cleaner. Make sure to consider the compatibility of each component to ensure they work harmoniously together.
Understanding the design requires reviewing the assembly instructions or diagrams to visualize how each part connects. This step is crucial to prevent mistakes during the assembly process and allows for a smoother construction experience.
Assembling the motor unit involves securely mounting the motor within a sturdy casing and connecting it to a power source, which may include wiring and switches. It’s essential to ensure that all electrical components are insulated to prevent short circuits or electrical shocks.
Attaching the dust container is critical as it collects debris; ensure it is tightly sealed to avoid any dust escaping during operation. A well-fitted dust container will also allow for easy removal and cleaning after use.
Installing the vacuum hose is another vital step, as it channels the suction from the motor to the dust container. Make sure that the hose is firmly connected to both parts to maximize airflow and suction power.
Setting up the filters is necessary for maintaining air quality and prolonging the life of the vacuum motor. Ensure that filters are easily accessible for regular cleaning or replacement to keep the vacuum performing optimally.
Conducting a safety check is paramount to ensure that all components are securely fastened and that there are no potential hazards. This includes checking for any exposed wires or loose parts that could pose a risk during operation.
Finally, testing the vacuum cleaner allows you to confirm that it functions as intended. Monitor the suction strength and listen for any unusual noises, making adjustments as needed to improve performance.
How Do You Safely Assemble the Key Components?
To safely assemble the key components of the best DIY vacuum cleaner, follow these essential steps:
- Motor Assembly: Begin by selecting a compatible motor that suits your vacuum’s power requirements. Secure the motor to a stable base using screws, ensuring it is adequately insulated to prevent electrical hazards.
- Dust Container: Choose a dust container that fits the design of your vacuum cleaner and is made from durable materials. Attach the container securely to the body of the vacuum, ensuring it seals properly to prevent dust leakage during operation.
- Filter System: Incorporate a high-efficiency filter to trap fine particles and allergens. Install the filter in a way that allows for easy removal and cleaning, which is essential for maintaining optimal performance.
- Hose and Attachments: Select a flexible hose and various attachments suited for different cleaning tasks. Securely attach the hose to the vacuum body and ensure that each attachment fits snugly to avoid losing suction.
- Power Supply: Ensure that the power supply is appropriately rated for your motor and safely wired to prevent short circuits. Check all connections for stability and insulation to avoid any electrical risks during use.
What Checks Should Be Done to Ensure Optimal Functionality?
To ensure the optimal functionality of the best DIY vacuum cleaner, various checks should be performed:
- Filter Maintenance: Regularly check and clean or replace the filters to maintain suction power and prevent dust buildup. Clogged filters can severely hinder performance and reduce the vacuum’s efficiency.
- Brush Roll Inspection: Inspect the brush roll for hair or debris entanglement that can impede its rotation. A clean brush roll is essential for effective dirt pickup, especially on carpets.
- Hose and Attachment Checks: Examine hoses and attachments for blockages or damage, as these can lead to reduced airflow and suction. Ensuring these parts are clear and in good condition is vital for overall performance.
- Motor Functionality: Assess the motor for any unusual noises or overheating, which could indicate mechanical issues. A well-functioning motor is critical for optimal suction and efficiency in vacuuming tasks.
- Power Supply Verification: Check the power cord and plug for frays or breaks, and ensure the vacuum is properly plugged in and receiving power. A faulty power supply can prevent the vacuum from operating effectively.
- Bag or Dirt Container Status: Regularly empty the dust container or replace the vacuum bag to prevent loss of suction. An overloaded bag or container can significantly reduce the vacuum’s cleaning ability.
- Wheels and Mobility: Inspect the wheels for smooth movement and check for any debris that might hinder mobility. A vacuum that moves easily and smoothly is more effective and user-friendly during cleaning tasks.
What Benefits Do DIY Vacuums Offer Compared to Commercial Options?
| Aspect | DIY Vacuums | Commercial Vacuums |
|---|---|---|
| Cost | Generally lower initial cost, as you can use readily available materials. | Higher cost due to brand value and advanced features. |
| Customization | Highly customizable to fit specific needs and preferences. | Limited customization options, mostly factory settings. |
| Performance | Can be tailored for specific tasks, but may vary in efficiency. | Consistent performance with tested efficiency for various applications. |
| Maintenance | Maintenance can be done easily as parts are often homemade or standard. | Professional servicing may be required, often at a higher cost. |
| Weight | Can be made lightweight depending on materials used, but may lack structural integrity. | Generally designed for optimal weight distribution and balanced for ease of use. |
| Durability | Durability varies based on materials used; may not withstand heavy use. | Built to last with high-quality materials and designed for frequent use. |
| Availability of Parts | Parts might be harder to source; depends on the materials chosen. | Parts are readily available and often standardized for easy replacement. |
| Environmental Impact | Can be more eco-friendly if using recycled materials; however, efficiency may vary. | May incorporate energy-efficient technologies, but packaging and manufacturing can have environmental costs. |
How Does Customization Enhance Your Cleaning Experience?
Customization significantly enhances your cleaning experience by allowing you to tailor equipment and techniques to your specific needs.
- Personalized Attachments: Custom vacuum cleaners can come with various attachments designed for specific tasks, such as upholstery, crevices, or hard-to-reach areas. These attachments improve efficiency and effectiveness, ensuring that every corner of your home receives proper cleaning.
- Adjustable Suction Power: The ability to customize suction power allows users to adapt their vacuum to different surfaces, from delicate curtains to thick carpets. This flexibility prevents damage to sensitive materials while still providing a thorough clean on more robust surfaces.
- Size and Weight Customization: A DIY vacuum cleaner can be designed to suit the user’s physical capabilities and cleaning environment. Whether lightweight for easy maneuverability or compact for storage, this customization ensures that cleaning is less of a chore and more manageable.
- Filter Options: Customization can include choices in filtration systems, such as HEPA filters for allergy sufferers. Selecting the right filter not only improves air quality but also enhances the overall cleaning effectiveness by trapping more dust and allergens.
- Color and Aesthetic Choices: Personalizing the look of your vacuum cleaner can make the cleaning experience more enjoyable. Having a vacuum that matches your home décor or personal style can motivate users to maintain a regular cleaning routine.
- Smart Technology Integration: Incorporating smart technology into a DIY vacuum cleaner can enhance usability, allowing for features such as scheduling, remote control, and app integration. This tech-savvy approach can streamline cleaning processes and make them more convenient.
What Cost Benefits Can You Expect from a DIY Approach?
When considering a DIY approach for a vacuum cleaner, there are several cost benefits to take into account:
- Lower Initial Investment: Building your own vacuum cleaner typically requires purchasing basic materials and components rather than a fully assembled product, which can significantly lower the initial cost.
- Customization: DIY vacuum cleaners can be tailored to your specific needs, allowing you to choose materials and features that suit your cleaning requirements, potentially reducing costs associated with unnecessary features.
- Reduced Maintenance Costs: By understanding the inner workings of your DIY vacuum, you can perform maintenance and repairs yourself, saving on servicing fees that you would incur with commercial products.
- Energy Efficiency: A DIY vacuum can be designed with energy-efficient components, leading to lower electricity bills over time compared to many commercially available models.
- Long-Term Savings: While the upfront cost of a DIY vacuum may be low, the durability and simplicity of your design can lead to longer-lasting use, reducing the need for frequent replacements.
Lower Initial Investment:
Building your own vacuum cleaner typically requires purchasing basic materials and components rather than a fully assembled product, which can significantly lower the initial cost. This means you can spend less on tools and parts compared to the price of a brand-name vacuum cleaner, allowing you to allocate funds elsewhere.
Customization:
DIY vacuum cleaners can be tailored to your specific needs, allowing you to choose materials and features that suit your cleaning requirements, potentially reducing costs associated with unnecessary features. For example, you can select a more powerful motor or a different type of filtration system based on the surfaces you clean most often.
Reduced Maintenance Costs:
By understanding the inner workings of your DIY vacuum, you can perform maintenance and repairs yourself, saving on servicing fees that you would incur with commercial products. This knowledge empowers you to troubleshoot issues as they arise, avoiding costly repairs and prolonging the life of your vacuum.
Energy Efficiency:
A DIY vacuum can be designed with energy-efficient components, leading to lower electricity bills over time compared to many commercially available models. By selecting efficient motors and optimizing design, you can create a vacuum that uses less power while maintaining strong suction performance.
Long-Term Savings:
While the upfront cost of a DIY vacuum may be low, the durability and simplicity of your design can lead to longer-lasting use, reducing the need for frequent replacements. This longevity means that over time, the savings from not having to buy new vacuums can be substantial, making your initial investment worthwhile.
What Safety Measures Should You Adopt While Building a DIY Vacuum Cleaner?
When building a DIY vacuum cleaner, it’s essential to implement various safety measures to ensure a safe and effective construction process.
- Wear Protective Gear: Always wear safety glasses and gloves to protect your eyes and hands from debris and sharp objects during construction.
- Work in a Well-Ventilated Area: Ensure that your workspace is well-ventilated to avoid inhaling dust or fumes that may arise from cutting materials or using adhesives.
- Use the Right Tools: Employ appropriate tools for the task to prevent accidents; for instance, use a drill with the correct bit when making holes, and avoid using damaged equipment.
- Handle Electrical Components with Care: If your DIY vacuum cleaner requires electrical components, make sure to disconnect power before working on wiring and use insulated tools to prevent electric shock.
- Follow Manufacturer Instructions: If you are repurposing parts from existing appliances, always follow the manufacturer’s instructions for safe disassembly to avoid damaging the components or injuring yourself.
- Secure Loose Clothing and Hair: Tie back long hair and avoid loose clothing that can get caught in moving parts, which can lead to injuries during operation.
- Test in a Controlled Environment: Once assembled, test your DIY vacuum cleaner in a controlled space to ensure it operates safely without causing damage or injury.